
| 일 | 월 | 화 | 수 | 목 | 금 | 토 |
|---|---|---|---|---|---|---|
| 1 | 2 | 3 | ||||
| 4 | 5 | 6 | 7 | 8 | 9 | 10 |
| 11 | 12 | 13 | 14 | 15 | 16 | 17 |
| 18 | 19 | 20 | 21 | 22 | 23 | 24 |
| 25 | 26 | 27 | 28 | 29 | 30 | 31 |
- 구문과 의미
- 프로그래밍이란
- 자바스크립트의 특징
- 프로그래머스 공원 산책
- 프로그래머스
- !x.includes()
- 자바스크립트
- 소오름~
- 가우스의 공식
- 배열 최솟값
- for반복문
- arr.push()
- 행렬...
- .map()
- a && b
- ES6 브라우저 지원 현황
- 알고리즘
- for문
- .split()
- async-await
- JavaScript
- 자바스크립트와 ECMAScript
- Ajax란?
- 소름돋는 알고리즘
- 자바스크립트의 탄생배경
- Promise.all()
- array.reduce()
- 어려운데ㅠㅠ
- 삼항연산자
- Math.min
- Today
- Total
Ming's develop story
Chapter3 - 컴포넌트에서 리덕트 데이터 사용 및 상세페이지와 연결 본문
Chapter3 - 컴포넌트에서 리덕트 데이터 사용 및 상세페이지와 연결
Ming 2021. 11. 23. 04:081. 리덕스 훅
리덕스도 훅이 있는데 상태, 즉, 데이터를 가져오는 것 하나, 상태를 업데이트할 수 있는 것 하나
이렇게 두 가지를 정말 많이 쓴다! 더 많은 (훅 보러가기→)
// useDispatch는 데이터를 업데이트할 때,
// useSelector는 데이터를 가져올 때 씁니다.
2. BucketList.js에서 redux 데이터 가져오기
이런식으로 콘솔로 확인해서 내가 가져오려는 state의 값중 리스트 값을 찾아 불러와준다.
이는 위와 같이 버킷리스트 함수에서 프롭스를 통해 가져오는것을 대체할 수 있다.\
이후 원래의 값과 일치시켜주기 위해 my_lists로 변경해준다.
Tip. 만약 잘 작동하는지 한번 더 확인하고 싶으면 모듈의 initialState 리스트에 값을 하나 추가해보자
3. App.js에서 redux 데이터 추가하기
추가하기 기능을 구현했던 App.js에서 useDispatch를 import 해준다.
함수 안에 위와같이 dispatch를 불러오고 액션함수 객체를 불러와야 하는데 매번 저 형식으로 불러오기 귀찮기 때문에
bucket.js에 만들어 두었던 액션객체를 리턴해주는 함수 createBucket을 import 해주고,
위와같이 작성해주면 끝~~
4. 상세 페이지로 파라미터 값 넘기고 불러오기
url로 파라미터 값을 넘기려면 path 주소 뒤에 /: 를 붙여준다! (App.js)
이후 Detail 컴포넌트에서 파라미터를 가져와야한다
useParams를 import해주고 useParams를 지정해준다.
이후 파라미터 값이 잘 넘어오는지 console.log로 확인하는데 오류가 난다.
왜냐하면 BucketList.js에서의 온클릭 주소를 변경해주지 않았기 때문이다!
위와 같이 BucketList.js의 온클릭 부분에 detail 뒤에 /와 "" 바깥에 + index를 추가해준다.
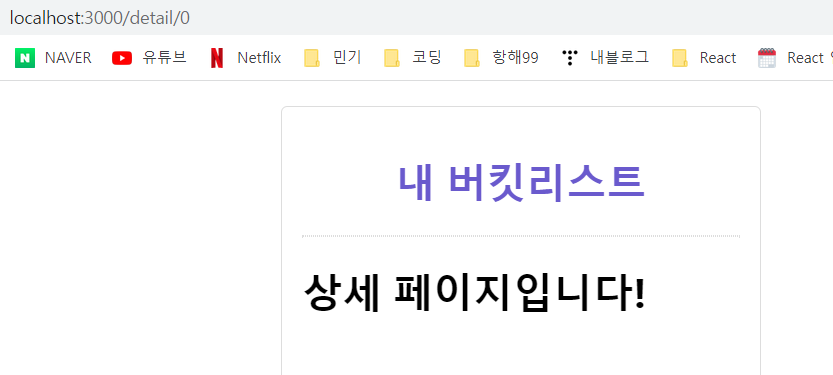
그러면 위와 같이 url에 인덱스 번호가 붙으며 상세페이지도 잘 나오는 것을 확인할 수 있다.
이젠 값을 불러올 차례!!
import { useSelector } from "react-redux";
값을 불러오는 useSelector를 Detail.js에서 import 해준다.
아까 배웠던 방법으로 리스트를 불러오고 잘 나오는지 console.log로 확인!!
근데 헷갈리기 쉽기 때문에 아까 지정해놓은 const index = useParams를 param으로
버킷리스트의 찐 인덱스는 const bucket_index = params.index로 지정해보자
콘솔을 통해 값이 잘 나오는지 확인해보고
|
import React from "react";
import { useParams } from "react-router-dom";
import { useSelector } from "react-redux";
const Detail = (props) => {
const params = useParams();
const bucket_index = params.index;
const bucket_list = useSelector((state) => state.bucket.list);
return <h1>{bucket_list[bucket_index]}의 상세 페이지입니다!</h1>;
};
export default Detail;
|
받아서 불러온 그 값을 적용해보자!

'스파르타코딩클럽 - 항해99 > 항해99 Chapter3 - react 주특기 기본' 카테고리의 다른 글
| Chapter3 - 점수화면 만들기 (3주차) (0) | 2021.11.25 |
|---|---|
| Chapter3 - 버킷리스트의 데이터를 삭제해보자 (Quiz) (0) | 2021.11.23 |
| Chapter3 - 리덕스 써보기(덕스 구조, 모듈 만들기, 스토어 만들기 및 컴포넌트 연결) (0) | 2021.11.22 |
| Chapter3 - 리덕스를 통한 리덕스 상태관리 (설치, 개념, 용어, 특징) (0) | 2021.11.22 |
| Chapter3 - 리덕스란? (0) | 2021.11.22 |


